
Wednesday, April 16, 2014
Simplicity 3673 Finished!
Monday, April 14, 2014
Bringing All the Pieces Together

After making all the alterations, I'm reasonably satisfied that the garment will be successful enough to be worn. At this point, I make a list of the notions needed to complete the garment. I very rarely buy notions at the same time I buy the fabric for a many reasons.
First, I never know exactly how the fabric will wash. Sometimes after washing the fabric, it is an absolute disaster that needs to be tossed; other times I need to choose another more appropriate pattern. Either way, I will have wasted money on notions if I have purchased them with the fabric.
Secondly, sometimes the alterations process shows that the pattern is either inappropriate for my body shape or the pattern is just poorly drafted. Both of these can happen and I wouldn't have wanted to spend money on notions.
Next, after years of sewing, I have a bit of a stash of buttons, zippers and thread. I like to "shop my stash" before making my final list of needed notions.
Finally, where I live the fabric store is not the same place as the haberdashery shop.
After a visit to the shops, I pin my pattern directions, envelope and notions to my cork board and I'm ready to begin. I follow the pattern guide sheet rather closely working each bit and fitting as I go. I'm afraid it all gets rather messy until it all comes together in the end.
Sunday, March 23, 2014
First, the Planning and then some more Planning.
Washing the fabric, softened the cotton and loosened the weave. I need to plan on lining this jumper with this particular fabric. Luckily, the standard pattern directions have the sewer lining the bodice. It will be very simple to add a lining to the skirt section. Next, I create a project page in my sewing diary. I either draw a simple representation of the garment or add a color copy of the envelope front. I date the entry and note which view I'm making as well as the size from which I'm starting my alterations.

I know that there are several alterations that almost always have to be done. I usually need to add about 5/8 of an inch to each side of the shoulder seam. I can't forget to draft this into subsequent sleeve heads or arm hole facings. Luckily, this pattern has neither as I will be fully lining the top with the same pattern piece cut from the lining fabric. Also, I often need to take out some along the center line of the front and back and add something to the bust darts or gathers. I have a C/D-cup sized bust line and most industry standard patterns are drafted with a B-cup in mind.
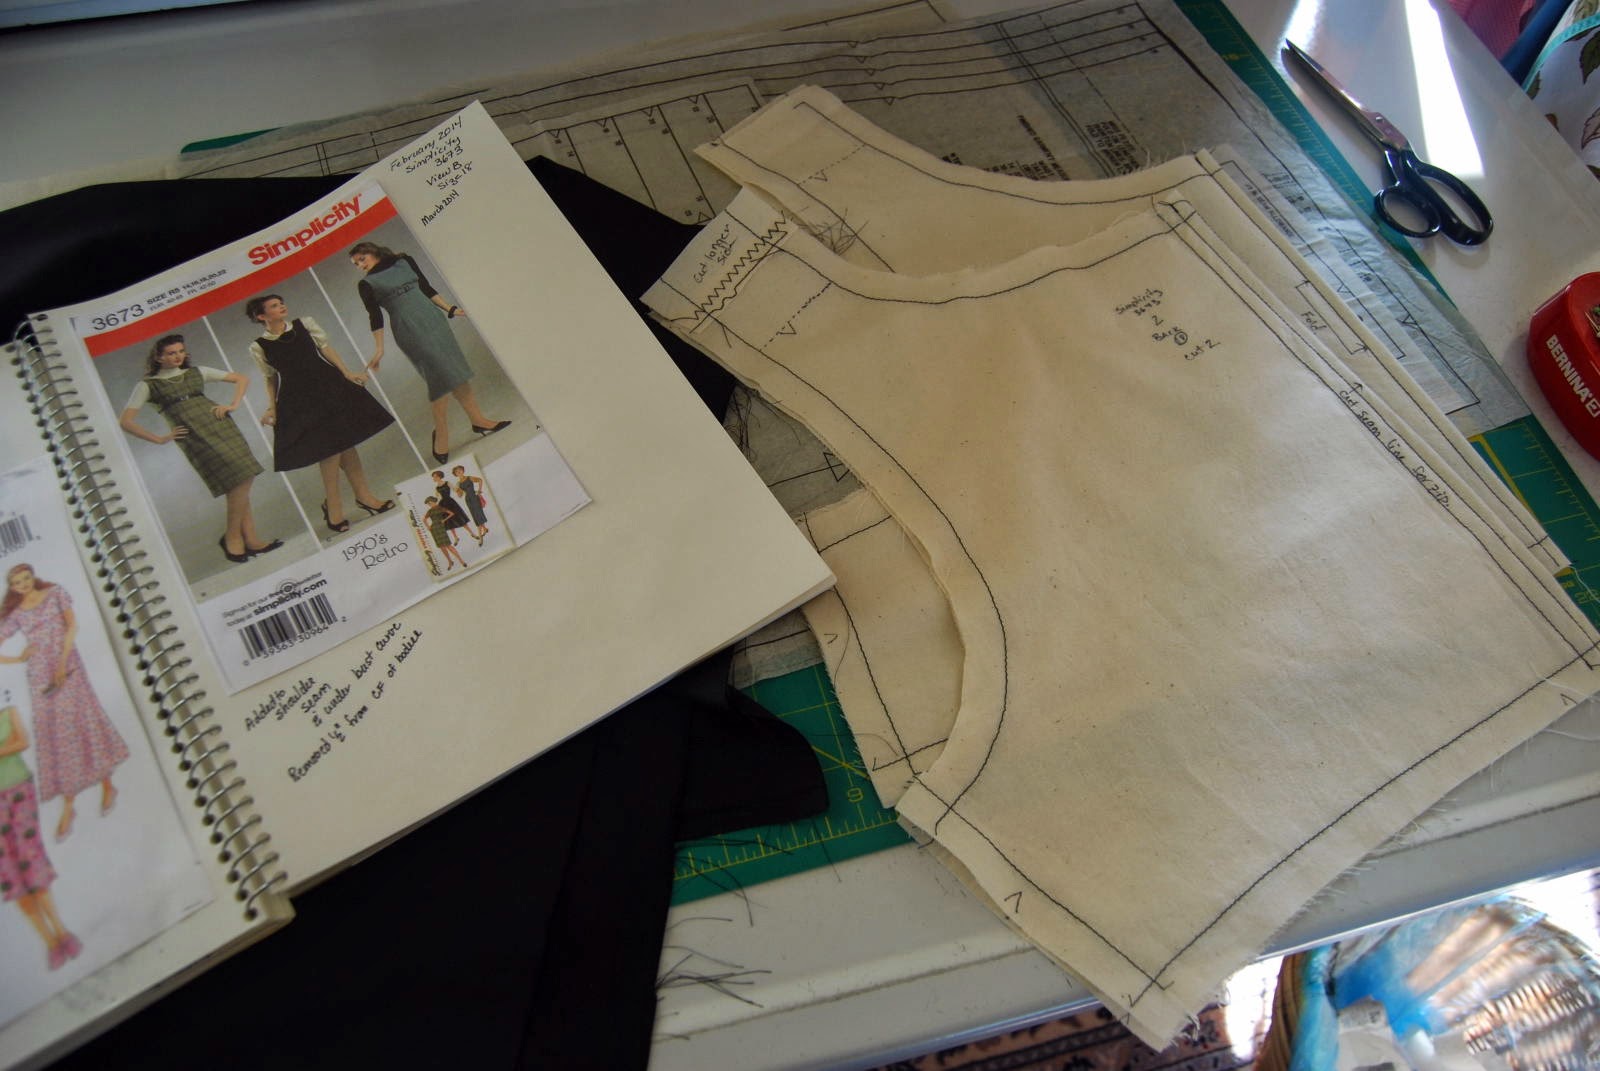
Above you can see the redrafted muslins for the bodice. The back pattern piece is showing and you can see the additional length on the shoulder as well as the removal of some of the width in the center back. I also added about a 1/2 inch to the bust curve at the empire line to compensate for the the larger bust line. I also make note of these alterations on my project page in my sewing diary.
Friday, March 21, 2014
A Retro Jumper
Now's the time for some clothes and I prefer the retro look.

Here's a retro reprint pattern: Simplicity 3673. I store the pattern pieces in a large manilla envelope and I put the pattern envelope in a page protector in a 3-ring binder. The new pattern envelope is large enough to add redrafted pieces to the original pattern. I also like having my pattern envelopes stored seperately. After years of sewing, I now have my own personal pattern selection book of patterns I know and like. When shopping for fabric, I can just take the chosen pattern envelopes in their page protectors to the shops. No more lost pattern pieces and no more torn and unreadable envelopes.

This is the first time I'm making this design. I've chosen a Japanese cotton. It's a loose weave knubby textile in a small black and brown check. My first job after choosing the fabric is washing the fabric as I would the finished garment. If I don't like the result, I can do one of two things. Choose a different pattern from my personnel pattern book that would be more appropriate or add the fabric to my stash and head back to the store for a different fabric for this pattern or a different pattern that will give a better result with the washed fabric.
Saturday, March 8, 2014
Finishing those Dinner Napkins
After going to the store and getting some new white thread for the over-lock machine, I sat down to finish up this project. I set up the over-lock machine for a 3-thread rolled hem and I hemmed the napkins one after another; trimming off a scant 1/4 inch. Here's a close up of the process.

I hemmed the napkins in "clothes-line" fashion rather than turning each corner. That is, I sergerd one straight edge followed by the straight edge of another napkin. When one edge on all the napkins was completed, I cut the them apart and hemmed the second edge. After all four edges were hemmed, I trimmed the hanging threads from all four corners and applied a small dot of Fray Check to each corner.

Finally, I starched and ironed the napkins. I got more than twenty new family dinner napkins from those bedsheets. When the napkins get too worn or stained, I toss them into the clean rag bucket for a couple of more scrubs before they are finally discarded. I'm afraid that our linens live very long lives being used reused in our house.
Tuesday, February 18, 2014
Dinner Napkins
I cleaned out my linen closet today and found I had three fitted sheets that had worn to the point of not being useful as bed linens. Are they ready for the rag bag? Absolutely not. There are to be reborn as everyday napkins for the dinner table. Here's how.
This is what you will need to get started. In addition to the old sheets, you'll need a pair of scissors, a measuring tape and some sort of marker; either tailors chalk, a fabric marker or even a soft pencil.

The next step is to cut off the elastic and corner seams from the fitted sheets. Just cut them off, don't bother to unpick them. Next, cut or tear the sheets into napkin squares. I use a 18" square. After serge finishing the edges with a rolled hem, I get a 17" to 17.5" square. This is a generous napkin for the family dinner table. You can cut your squares any size you wish.

After tearing the sheets into squares, I give them a very, very quick pressing. This gives me the opportunity to throw out any squares which have poor fabric from the worn spots in the original sheets. They are also a bit flatter for ease in hemming the edges.

At this point, I have more than twenty new napkins that are ready for hemming. I am out of white cone thread to finish this project, so the prepared squares are placed in a grocery bag and I note the need for thread on my sewing room shopping list. This project goes on my PIGS shelf for now. When I get a few things on my list, I'll make a trip to the sewing store for all the things on my list.
"PIGS?", you ask. "Yes, PIGS, Projects In Grocery Sacks. I always have several projects going at once. It's just the way I work in my creative space.
Subscribe to:
Posts (Atom)
-
Now, it is nearly March. The winter was a tough one and it is not over yet. Weather and health were the two main foci. The snow and ice have...
-
 Dear Readers, December has come, dark, rainy, wet, miserable December. A month better designated for hibernation than celebration....