My French is broken. I have lived in a French speaking country for nearly a decade and my French is broken. I can read Balzac and Zola and I can ask for a novel by Jules Verne in the bookstore, but I cannot understand my plumber, the satellite guy, the post person, most shop keepers, and even the daily newsreader on the TV. My French is broken or rather my French ear is broken. For ten years, I have heard nothing but one continuous noise emanating from any Belgian French speaker within five feet of me. Each and everyone sounds like the "adults" in an old Charlie Brown animated film, "Wawa wa wa wawa wa wa.." I cannot find the beginning or end of a single spoken word and I know the problem is mine, or rather my ears'.
I have tried to remedy the situation, with endless radio and TV. I've attended endless expensive lessons, purchased workbooks and CD's, and downloaded mp3 files to play while sleeping. My last French professor recommended hypnosis and I think he was being kind while truly thinking I needed more in depth therapy to release some deeply held psychosis against the Belgian culture. This may also be true, as at least a dozen Belgians attempted to murder me by car during the first four weeks in the country, but that story is for another time or perhaps never.
The problem is my ear and I have to be patient and so starts September and another round of lessons. As per my teacher's recommendations, I tune in the French satellite again. There are five stations. If I'm lucky, once a week there will be something interesting between the endless talking heads, game shows and singing contests. Tonight, I hit the jackpot, a movie. The title is in French, "Celui qu'on attendait" and it translates roughly to "The one we were waiting for". This sounds vaguely promising. I'm expecting some old villager sitting at a rough table in a dark room expounding about the lost good old days punctuated by scenes of rustic village life, food, wine, broken trucks, shoddy electricity, shady government officials and the like. This is roughly what I get, except that the old man in this film is constantly screaming "Je voudrais aller a l'aeroport!" Well, I get that one sentence. It's been repeated at least five times. I must be making progress right?
Yeah, I'm making progress alright. It took 45 minutes and half the film to figure out this story is about an old French actor who some how gets lost in Armenia and an impoverished village takes full advantage of his situation in scenes of rustic village life, food, wine, broken trucks, flaky electricity and shady government officials. And the vast majority of dialog, in the movie directed by Serge Avedikian and fillmed in Armenian, you guessed it ... it's Armenian. Well, I now know six slightly different ways to say "I want to go to the airport.", maybe the universe is telling me something.
Thursday, September 28, 2017
Today's Whinge
Many of my posts on Facebook are in fact whining and whinging because frankly..Facebook is my virtual wall punching apparatus. It's cheaper than hand surgery. So take this for what it is...it is whinging.
Today, full of optimism and energy, I hit the kitchen first thing. I cleaned out the frig, wiped the shelves, cleaned the stove top, cleaned the grease off the cabinets and finally, moved all the furniture out and scrubbed the floor by hand...with a scrub brush...and a bucket of rinse water. Oh man, did that room look good! Self-satisfied with the feeling that only comes with finishing off the endless boredom of daily household chore list, I went upstairs for my morning cleanup and since I had done all the hard and messy work of the day I was free to indulge in bon-bon eating and TV for the rest of the day because that's the lie all housewives tell the outside world. I put on some decent clothes and even pressed my blouse collar and then, I returned to the kitchen to rewarded myself with a large, milky, steaming cup of hot coffee.
With all that milk, I needed to warm my coffee up a bit more in the microwave. I stood at the kitchen window with my book in hand waiting for the microwave anticipating stealing about thirty minutes of a blissful reading in the sun on the terrace. "DING" I opened the vengeful white box, took out the cup and began my journey to the door. I failed to note the power setting on the microwave had been reset.
Super heated coffee exploded out of the cup halfway through my journey to the door. Luckily and unluckily, I had set my newest cookbook on top of the giant coffee mug so as to have a free a hand for the doorknob. This move saved me from spending any time in A&E. I am so thankful for that.
The book, however directed hot milky coffee laterally. The cabinets took a direct hit, my clothes, and then the floor. As a final punctuation, the book landed splat and directed the remaining liquid up my skirt, down my legs and into my shoes. I even put shoes on this morning, dammit, good leather ones, not the usual rinse and wear Crocs. Well, thinking, "no good deed...", I sighed deeply and in my damp clothes, I wiped up the puddle, tossed the book, wiped down the cabinets and the counter tops and finally, damp mopped the floor. Pleased I had, yet again, cleaned the room, I went upstairs to change my clothes.
Returning through the kitchen with a load of laundry ten minutes later and in some wool socks, I am now walking through cold coffee puddles. How can this be? Yep, the coffee had shot out laterally with enough force enter INTO the cabinets, taking a full thirty minutes to run though the pots and pans and cereal boxes, around the canned soup and through the dishwasher tabs to finally return to the place of lowest entropy, the floor, only to be taken up again by my wool socks and spread further through the garage into the laundry room. Well, here let me fix that for you...."no good deed goes unpunished, twice."
It didn't end with the coffee in the kitchen...I'm now up to my neck with a broken over-engineered German heating system that has been taught to speak French. The manual is in German, the furnace heater's computer controlled programmable climate control system speaks French, my plumber speaks Walloon. I speak English and I still haven't had my coffee.
The final irony to this day is that the ruined book was about Danish hygge.
Tuesday, August 1, 2017
Pattern Haul
 Look what came in the mail today! More than I can ever sew. I'm deep into denial a to the level of sewing ambition disease I've contracted this summer. You should see the studio! I've got to make a priority list and stay out of my email box of promotions from pattern companies.
Monday, July 10, 2017
Daydream Doily
 Doilies are very old fashioned.They are viewed as something belonging to the past when antimacassars were an essential part of each sitting room. Doilies protected tables from scratches from vases, lamps and brica-brac. We have little of this these days. And who has a sitting room reserved for only the best of guests? Not I. But I still like a good doily. I can't explain it. I can't justify it. I can't not have a new one.
This one was the third one I tried this summer. I had a bit of cotton thread left but I had no idea how many yards where left on the spool and I did know that the modern thread was thicker than the original called for in the antique pattern directions. So I guessed and I guessed wrong, not once but twice! The first two selected patterns are noted for future doily derangement. This is the third pattern chosen and it's called the Daydream Doily #7318. It's from a old book I own called "The Complete Book of Crochet" by Elizabeth L. Mathieson.
 |
| Daydream Doily #7318 - about 14inches in diameter. |
 |
| Front hall table. |
Friday, July 7, 2017
Small Repairs: How to Sew on a Button

Sewing on a button is easy, but it does require a few tricks to make the result professional. The inclination is to sew the button on very tightly and very thoroughly. I suppose, this is a response to make sure to never lose the button again. However, tightly sewn buttons do not allow the button hole to close snugly underneath the button, but rather the tightly sewn button spreads buttonhole causing puckers in the button placket. The end result is the sloppy appearance of misplaced buttons and no amount of readjusting the button placement will solve this problem.


After winding the shank bring your needle to the back and tie a knot using that long tail you left on the thread when you started.


Blazer and coat button often have a shank on the back of the button. Sew these button on loosely also making a short thread shank in addition to the button's shank. The still assures the button to rise above the thickness of the garment fabric.
Follow these simple steps and you will lose fewer buttons.
Thursday, June 29, 2017
Let's do this again!
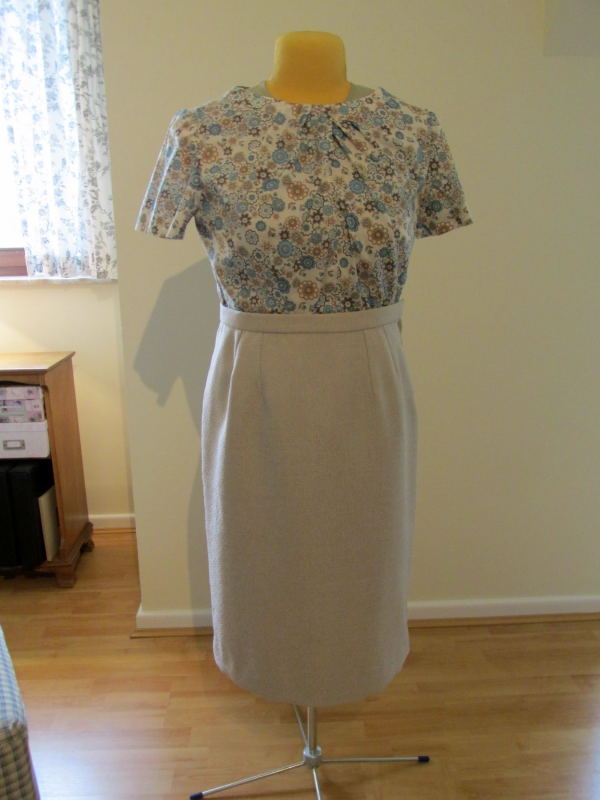
Do you remember this dress? I do. I made it to be an everyday dress and I drafted the pattern as a copy of a vintage design that appeared in Vogue's New Book for Better Sewing. I didn't get the neckline and shoulder area exactly correct and the neckline gaped and pulled open. I was constantly adjusting the dress as it pulled back over my shoulders. After a couple of wearings, the dress went back into my fabric stash.
Then I found this pattern as a good substitute for self drafted dress. It's a reprint from Simplicity and I liked the coat option that came with the pattern.


This is the front view and it's not a particularly flattering photo for the dress. It is better than that. I've recycled the self-fabric belt from the old dress. I can wear this chemise two ways. I prefer a bit of a defined waistline.


Then I found this pattern as a good substitute for self drafted dress. It's a reprint from Simplicity and I liked the coat option that came with the pattern.

So I recut the old dress and made a new one. The back has an invisible zipper and you can see the horizontal yoke seam that goes across both the front and back.

This is the front view and it's not a particularly flattering photo for the dress. It is better than that. I've recycled the self-fabric belt from the old dress. I can wear this chemise two ways. I prefer a bit of a defined waistline.

This is the dress with my new sweater. This is how I would normally wear this during the normal work week at home. Is the dress a stunner fashion and fit wise? I would say no. It is a simple, easy to make dress for daily housework. Would I make the dress again? Yes, probably would give it a try in ponte knit. I might be able to make a smaller size with a knit and hopefully have a slightly slimmer silhouette.

Monday, June 26, 2017
The Katia Yarn Sweater
This is the sweater I knit from the frogged yarn from the Bluebell sweater. I found the pattern in a Katia Yarns magazine called Special - Fils Basiques #10 Automme/Hiver. (#10 Autumn/Winter - Yarn Basics)
I chose Modele #09 on page 8. The original sweater has three colors. I chose to simplify the look by using the teal yarn from the frogged sweater for the body and the sleeves and then I chose a mousy, mole colored brown for the cuffs and collar.
The gauge was 19.5 stitches and 29 rows knitted in the pattern makes a 10cm x 10cm square. I managed this with US#7 needles. I used US#5's for the rib knit and US#7's for the main pattern. The pattern calls for 3.5mm and 4.0 mm needles. I am a very tight knitter...much to uptight...really I shouldn't be knitting. It's not good for me.
Here is the completed back. The pattern calls for the back to be knitted to 43cm before the armhole shaping. I am short in the torso and I know this yarn stretches. The fabric is fairly dense and weighty with this stitch pattern. I knit the smallest size (38-40) and shortened the length to 37cm. Will I get a sweater that's too small? Or have I accounted for the unnatural growth of this yarn?
There's the finished sweater. I chose some brown petersham ribbon for the back side of the front band and some wooden buttons.
 Here's the back on my dress form. It is much to warm to model this garment. Trust me it fits well and it grew a size during blocking! I had a lot of misgivings as I knit this. It really looked too small and I had to trust the planning and guessing I did about the yarn.

And here is the front of the sweater. This is going to be appreciated this fall.
I chose Modele #09 on page 8. The original sweater has three colors. I chose to simplify the look by using the teal yarn from the frogged sweater for the body and the sleeves and then I chose a mousy, mole colored brown for the cuffs and collar.
 |
| Gauge Swatch |
 |
| The back |
Here is the completed back. The pattern calls for the back to be knitted to 43cm before the armhole shaping. I am short in the torso and I know this yarn stretches. The fabric is fairly dense and weighty with this stitch pattern. I knit the smallest size (38-40) and shortened the length to 37cm. Will I get a sweater that's too small? Or have I accounted for the unnatural growth of this yarn?
 |
| Finished! |


And here is the front of the sweater. This is going to be appreciated this fall.
Friday, May 19, 2017
Some Photos from the Calder Beanie
This is good "second" project for knitting. After you've mastered knitted dish clothes, move right on to garments. This hat is a good second project. It is quick easily mastered. Although, gauge is very, very important to all knitting and crocheting, a ribbed hat is very forgiving. Getting the gauge in the general region of "correct" will still result in acceptable results. The pattern for this project is available for free from the Rowan yard website. You will need to register your email to get the pattern. I chose two balls of Rowan hemp tweed yarn in a charcoal grey. I also knit this project as written, on two straight needles. The pattern could easily be converted to use a circular needle. It took about a week of knitting in front of the TV in the evening to finish this project.
 |
| Calder Beanie Project Planning |
 |
| The First Three Cable Twists |
 |
| Nearly Finished |
 | |||||||||||||||||
| Calder Beanie is finished and blocked. |
Sunday, April 23, 2017
Friday, April 21, 2017
The Demise of a Sweater
Just over two years ago, I wrote about a knitting project on this blog, The Bluebell Sweater. This month I frogged, or dismembered, dismantled, unpicked and unraveled this sweater. And here are the photos to prove it.
And that my friends, is two days of work. One to unpick and put the skeined yarn to soak. The second to dry the yarn and reball it. I also went shopping after soaking the yarn and found a new pattern for the old yarn plus two more balls of brown which you see in the above photo. More later....
 |
| The sweater stretched to size XXL. |
 |
| The yarn which gave me the sweater and its problems. |
 |
| The unpicked skeins plus two unused balls. |
 |
| The yarn soaking in cold water overnight. |
 |
| Draining like spaghetti for teenage boys. |
 |
| Laying the yarn in a towel |
 |
| Tied for the dryer. |
 | |||||||||
| Everything I have, all balled up. |
Tuesday, April 18, 2017
A Spring and Summer Suit

I went to my stash of patterns and put together a plan. I chose a straight skirt from a pattern I had already tested. This skirt is from Simplicity 2154. This is a retro reissue pattern a la Mad Men style. This skirt was "in" then and it's still accessible today.
The jacket is a new pattern for me, McCall's M6441. This a Palmer-Plestch fitting pattern. It is a princess lined jacket with a zip front. The pattern comes printed with a bunch of fitting lines which can be cut and adjusted for better fit. The instructions include an entire extra page of printed guidelines about how to use these additional lines to gain your best fit. The pattern goes along with a a Palmer-Pletsch fitting book, which I don't have, however I had no trouble using just the pattern for the information. I had not done a FBA for a princess line garment and this pattern made it very easy. I will be using the results I achieved with this pattern to make adjustments on future princess line patterns. The fitting information alone is well worth the price of the pattern, even at full price. I'm very pleased with this and I will be looking for more of these fitting patterns from McCall's.
I also went to my fabric stash for the suiting fabric and chose a nubby weave beige suiting fabric. I'm sure it was meant to look like a high-end raw silk suiting, but it, most assuredly, is not. The fabric is at least 15 years old, yes, my stash is that deep and that old, and I think it was a remnant end. In the end, I purchased some additional lining fabric, a front zipper and thread. This was a stash bashing, use what you already have project.
The following are photos of the finished production. I'm pleased with the result. Will this be an item that will last twenty years in my wardrobe? I don't think so. The zip front jacket will look dated after a while and the inexpensive fabric probably will not wear well. I do plan to get five to ten years of occasional wear from the garment. If one piece or the other is "retired" from my closet, the remaining piece is neutral enough to continue life as a separate.
 |
| Front View |
 |
| Back View |
 |
| Sleeve Cuff Detail |
 |
| Lining Detail with Print Blouse |
 |
| The Skirt Alone |
 |
| Jacket Detail |
Friday, April 14, 2017
A Word About Scissors

In a long ago previous post, I outlined a list for a basic sewing kit which I believe every household needs for simple clothing repair. This kit will also be your foundation for your future sewing equipment. I also kept in mind that some people who try sewing will not care for it and not continue in this hobby. Therefore, I kept the list to an absolute minimum number of items and discussed quality and cost of several items. For example, buying one high quality vinyl double sided measuring tape will last a lifetime if you sew or if you only do occasional mending or fabric projects. This difference in cost is minimal but the life cycle is much higher for the "best quality" item.
For most items, I recommended buying high quality tools to begin your collection, except for scissors. Counter intuitive? Maybe? But good quality sewing shears need to be purchased after you have a small amount of experience. Today, I'll repeat this advice and add to the information to try to help you with your first cutting tool investments. Previously, on the post titled, "A Very, Very Basic Sewing Kit", I stated the following advice about your first pair of scissors.
For an absolute beginner, however, I recommend buying a new pair of $10-$15 dollar dressmaking shears from the large sewing store or online. If you are particularly budget minded, a new pair of "orange" handled scissors from the office supply store will be just fine. The point, here, is that they are new! Don't go to the kitchen drawer and re-purpose old scissors. Even the new "orange" scissors will suffice for cutting fabric for your first six or seven projects before becoming too dull. By that time, you will know if sewing is going to be a long term love or a see ya' later frustration. At that time, you can make the investment for new high quality shears and "retire" your old scissors to be your paper scissors in the sewing room. If you are saying goodbye to sewing then your basic sewing kit can remain in its' box as a simple home mending kit. It will be ready and stocked for all your small clothing emergencies.When you have decided to invest in a pair of dressmaking shears, you should invest in the best possible pair you can afford. Two, you should protect them with your life, and use them only to cut fabric. And finally, three, have them sharpened, when needed, at an independent sewing store that specializes in sewing scissor sharpening. You may have to travel to do this and even leave your shears for sharpening at the store, but with careful use this won't happen too often. I sharpen my shears every 5-10 years, depending on the type of sewing projects I have done. Recently, some special occasion sewing with man-made fabrics have hastened the decline of the my shear's cutting edge. They are okay for now but before the next silk blouse, I need to schedule their maintenance visit to the sharpener.
At first you only need two pairs of scissors, your dressmaking shears and your paper scissors. You should buy bent handle, razor sharp shears in a size that could range from 8" to 10". What exact size you choose will depend on your sewing style and hand size and strength. In general, lighter weight and shorter shears are better for lighter weight fabrics and heavier weight longer shears are better for heavier fabrics. Also your own hand size will help you determine your shear size. This is why if you see a Saville row cutter's shears they will be absolutely enormous. The heavier suit fabric and the traditional male hand suited large shears that would be entirely out of proportion for most sewer's needs. View your shear purchase as an investment, buy your shears at a sewing store where the sales person will allow you to handle at least a sample of the shears before you buy them. Test the shears before you buy! But don't cut anything! Hold them in your cutting hand and open and close them several times. How do they feel in your hand? Are they comfortable to hold? Balanced in your hand? Do they open and close smoothly? As you open and close them slowly in the air, they should feel as if you are pushing a fork through the most fluffiest, smoothest, lightest cheesecake you can imagine, any more resistance than that and they will be tiring to use. Any less than that and you need to choose a different pair.
Your second pair of scissors for your sewing room are your paper scissors. They can be the ones your have "retired" from you original first sewing kit or they can be a new pair of scissors from an any office supplier. They also should be dedicated to your sewing room. You do not want to be chasing down scissors from the kitchen or garage every time you sew.
Now you have what you need to get started with sewing, your fabric shears, and your paper scissors. Never mistake one for the other and guard both carefully from other less informed household members.
As you become more experienced with sewing, you may find adding to your cutting tools very useful. I've listed several other sorts of other items that are useful. None are absolutely necessary to start and all make great suggestions for the dreaded question, "What can I get you for your birthday?"
Other useful items
Some 6" sharp point scissors for clipping, slashing and trimming
Small embroidery scissors are for cutting thread, hand sewing, small clips and fine detail cutting.
Thread snips are great for clipping threads at the machine or ironing board.
Pinking shears will help you finish the edges of raveling fabric if you don't have an overlock machine.
Rotary cutters are useful for slippery, silky fabrics and quilting. You must use a cutting mat with this option.
Duck bill applique scissors are for very close trimming of delicate fabrics and appliques. I find them useful for reducing seam bulk in collars and neckline facings as long as the fabric is lightweight.
Thursday, April 13, 2017
An Indie Pattern for the first time!
 This is the Plantain Tee Shirt by Dear and Doe Pattern Co. It is my first venture into an independent pattern company, a PDF pattern and a free pattern. Was it successful? Yes and no.
I have always been hesitant to venture to the indie pattern market. So much of it seems to be geared toward a younger, sweeter, thinner fashion sense. This is great for the indies and a perfect market in order to get more and newer sewing enthusiasts involved in the hobby. But not so much for me, I, the older, the more serious (all right, let's just say....I invented the witchy resting face.) the heavier dressmaker has little interest in sweet summer dresses, leggings and other such fashions of the fabulous young. I need structure, tailoring, and forgiveness. I knew about Dear and Doe for several years, but this season when their promotional email landed in my box, I just happened to miss-click and what opened before me was a trench coat pattern featuring a lovely lady that was more my size. So I took a look again and discovered they offer a free pattern via PDF download, the Plantain Tee Shirt. I like free and I took the bait and I'm hooked, but not on the printable PDF's. Good heavens, shoot me now!
Many folk may like the immediate satisfaction of instant downloads, but not me. We are very behind the curve on our computers and getting one piece of hardware to talk to another is a mammoth task. Then there is the scaling of the pattern itself, which was accomplished by hook and by crook from a printer whose language is set to something I know nothing about. After two years, I still cannot find the menu to permanently change the language default, temporarily, yes, but from a cold boot that printer remains locked in its mother tongue.
I digress. It is very easy for me to fall off the crazy cliff when dealing with technology and as one of the earliest adopters of home computers I have, in the last five years, become increasing hostile to the direction in which my human/computer relationship is shifting.
Back to sewing, after walking away from the printer, I still didn't have a pattern. There was cutting and taping and then I couldn't tissue fit the pattern. Tracing paper followed and then a tissue fit, luckily not much needed changing except some extra length in the torso. I think and it looks as if it is so, that the other patterns at Dear and Doe are available already printed. I'll pay for that and be patient with the post office.
I made it up in a light weight cotton jersey with a bit if viscose in it and this is where the project falls apart. I did not pay for or travel to get high quality jersey. I shopped locally and got something that did not wear well at all. It was nice at first off the bolt, and with the first couple of washings, but then all the cotton fibers in the fabric decided they had had enough and wanted to date the lint screen of my dryer. This fabric is washing away and becoming thinner and thinner. Fast fashion crap fabric has made it to my sewing studio and I DON"T like it. For all my time spent, I will have nothing to show for it in about three more wearings.
Back to the pattern...Even thought the fabric is a terrible flop. The pattern is most definitely a keeper. The neckline is flattering and the top drape very nicely. I will be putting this in my tried and true file and I will be shopping for German quality knits on my next trip east.
A final note for today, theNYTimes ran an article about the newest fashion trends and noted the move to lower hemline, higher necks and sleeves! Maybe covering my charwoman's knees, turkey neck and bat wings will suddenly become more fashionable. Maybe there will just be more choice. I think the time has come to give ladies of all sorts more choices and the freedom to make those choices about their own clothing.
Friday, April 7, 2017
A One Meter Shirt
 I had big plans for chemise silhouette dresses. Not only did I have one meter of olive twill in my stash, I had one meter of a matching woven stripe. When the plans crashed and burned, I had more stash than any woman has a right to own. I believe in reusing my mistakes and these two projects are a result of a poor choice. This is one reason why you will not often see me choosing bright colors and large prints. I change my mind about fabrics and patterns often and by the time I actually sew something the game plan has changed a dozen times.
The plan for these fabrics was the striped dress on the right, from a Japanese pattern book call "Feminine Wardrobe" by Jinko Matsumoto. It became the photo on the left, as skirt from Butterick 4461 and the shirt from McCall's 2094.


McCall's 2094 is a tried and true pattern for me. I don't even think that it is published any longer. These little shirts have been part of my wardrobe for nearly a decade. I've done a FBA on the pattern years ago and I prefer the short and sleeveless versions of this shirt.
Here's a closer photo of the collar and the fabric. This is more utilitarian sewing. There is nothing fancy about this. It is more about using the resources I already have to make something that I will use for many years to come.

Subscribe to:
Posts (Atom)
-
 Dear Readers, December has come, dark, rainy, wet, miserable December. A month better designated for hibernation than celebration....
 -
Now, it is nearly March. The winter was a tough one and it is not over yet. Weather and health were the two main foci. The snow and ice have...