I wish more of George Trippon could be found in Vogue's vault. The film is dated in fashion and fabric, but the information is timeless and George is very entertaining.
Friday, February 27, 2015
George W. Trippon
Sewing tutorials on YouTube are a dime a dozen. A few are very high quality, many are sadly lacking. Most fall into the beginner sewing category or they try to tackle too much in one video.
I wish more of George Trippon could be found in Vogue's vault. The film is dated in fashion and fabric, but the information is timeless and George is very entertaining.
I wish more of George Trippon could be found in Vogue's vault. The film is dated in fashion and fabric, but the information is timeless and George is very entertaining.
Wednesday, February 11, 2015
The Cost of Your Clothes

For this exercise, you will need a piece of scrap paper along with a pen or pencil. Go into your closet and look at each item. Estimate in round figures what you spent for each item. For example, think $50 for these jeans, $10 for this tee shirt, those are $100 shoes, go slowly and carefully adding up items. For each $100 dollar, make a tick mark on your paper. Don't forget the underwear, the swimsuits, the off-season clothes, the coats in the front hall closet, make a guess at what each item costs. When you have finished, add up the tick marks. Surprising, yes? It doesn't matter if you have a $3000, $30,000 or $300,000 wardrobe, if you are unaware of the cost of your clothing in relationship to your economic means the total can be a rough shock.
Many people make arbitrary rules about their clothing. I will only buy designer clothes. I will wear nothing that I haven't made. I only buy from thrift stores. I never buy anything at full price. I always shop at Neiman-Marcus. I feel these rules are rigid excuses not to take conscious control over our clothing choices. We are letting some one else decide what we a going to wear. The designer has his vision, the major department store's buyer has narrowed your choices. The thrift store find has been filtered through someone's closet and then through the store's manager. Even by choosing to wear only clothes that you have made, limits you to the patterns and fabric available in your area. Think about any "rules" you have about your clothing. Are they limiting you?
Finally, before you close your closet door, let's consider how you can get the most from your clothing dollar. It will not matter if you learn to sew or not. These thought exercises will serve anyone who must shop for clothing.
Cost vs. Wearing
Consider your cost per item versus the number of times that you wear the item. Your $75 dollar jeans are a bargain if you wear them twice a week. That's 72 cents a wearing if you only keep them one year. Jeans should last 2-5 years and that makes it 36 to 14 cents per wearing. The $75 holiday dress that you only wear once to the office Christmas party, doesn't seam like such a bargain any longer, even if it was marked down from $125.
Now, obviously, there are no hard and fast rules for this. Each person much balance their cost and lifestyle circumstances for themselves. Look over your closet, are there items you definitely should have spent less on? Note them down in a small book that you can slip into your purse. Conversely, are there items you spend more on? Note these also. Assign a range for the cost you are willing to pay. For example, I will pay $25-$75 for brand new jeans. But if they are at a consignment shop, my top price is $10-$12.
Cost vs. Quality
Consider your cost per item versus quality. Your basic white tee from a discount retailer will have a certain quality to the finish. I'll bet it isn't cut on the grain and after several washings the side seams have twisted and the length has shrunk. On the other hand, a good quality tee shirt will wash and wear hundreds of times and not look like you've slept in it. Does it still make sense to buy the $5 bargain or the more up market shirt?
Can you recognize the marks of quality for an item? Make some notes in your small book about what makes sense for you.
Cost vs. Longevity or Fad
Consider your cost per item versus it's fashion longevity. Ask yourself should I spend more on a classic navy blazer or a leopard print knit dress? A leather jacket or leather pants? Make a list of must have classic pieces for your wardrobe and lifestyle. This should be where you spend your most amount of thought when selecting these pieces. The classic pieces in my wardrobe are the little black dress, a tan trench coat, a white shirt, and fitted tee, a pencil skirt in tweed, jeans, a cotton shirt dress and a blazer. These items are always in my closet and these are the core items that I will spend a little more money on than other things.
Now that you've considered each of these three areas, you may wish to balance all three in terms of your closet. How? Let's consider the basic tan trench coat. It definitely has fashion longevity therefore you might wish to spend more on a higher quality item, but let's then consider the number of times you will wear it.
So you live in the desert.... Living in a dry arid climate would make my choice for this item to be only moderately priced or even, if I'm lucky, a consignment shop find. I would consider it only to be worn a half dozen times a year and it would feel unwise to spend huge amounts of money on a raincoat. I would, on the other hand, choose an inexpensive coat with very classic tailoring because I know it would be with me for many years.
So you live in London....Where else in the world is known for more rain, fog and changeable weather than London? I would also choose a classically tailored trench and I would choose the very best raincoat I could afford, knowing I would wear it nearly every week of the year. This is a climate where in addition to my core tan trench coat, I would be open to a second coat of lesser quality and perhaps more fashion forward. This could be another color or a different cut. I would replace this coat more often than my classic trench.
Make some shopping notes about what you need in your wardrobe and what you want to spend for it. Note also the qualities that will be important to you for each piece. Do this exercise when you don't have any sort of "shopping bug" working against your decisions. You want to create a game plan for yourself to make the most of your clothing dollar no matter if you learn to sew or not.
Tuesday, February 3, 2015
Stash Busting Project Number 1 - Grey Print Blouse

Here's a stash piece that is going to become a long sleeved blouse. This is an impulse buy from a remnants bin. I fell in love with the print and knew that this store has high quality fabric mixed in with lots of lower priced yard goods. The fabric felt nice, tightly woven and very crisp. But was it really good quality? I needed to be sure as I have been disappointed many times by the lack of transparent labeling of yard goods in Europe. Luckily, I was able to find the manufacturer's name on other items in the store and by the look and feel of those items, I was willing to guess that this piece was good quality but was from last season. The price was certainly within my budget and if it didn't wash well, I could always make a couple of grocery sacks out of the fabric. I bought it and stashed it.
I made McCall's 2094, View A from this piece. McCall's 2094 is currently out of print on the McCall's website. I think I bought this pattern around 2009-2010. I love this pattern. It's a simple blouse with four sleeve options. It has plenty of darting to help with fit and the collar is simple and well done. From cutting to finishing, the blouse took just a couple of days to sew. I've made versions of this pattern at least five times and I'm always pleased with the results.
Garment Finish: This crisp, firm cotton was easy to work with and pressed like a dream. I serged the seam finishes to keep the project moving along quickly. Grade: A-
Fit: This pattern has always been a favorite. I did a small FBA for this blouse, but I probably should admit my weaknesses harder and do a bit more adjustment in this area. Grade B+
Material Choice: A good quality printed cotton. It was an easy choice and gave excellent results. A+
Style and Wearability: Classic shirt styling along with simple details make this a wardrobe staple. It's already been through the laundry bin twice this month. I wore it with jeans on Saturday and earlier this month it went to lunch with a pencil skirt and sweater. Grade: A+
Overall: A
The photos are another problem. I'm definitely not pleased with these. My excuses are that it's January in Belgium and there is no day light. There really are no excuses. I should invest as much time in the photos as I do with the sewing. I hope that spring is coming soon.


Monday, January 26, 2015
Confessions - The Stash
I have an incredibly guilty secret, my sewing stash. It has grown to the point of needing an entire room in my house dedicated to its safe storage. Some of the stuff will never be downsized. I cannot see myself getting rid of my machines or my ironing board. But the rest, yeah, I've got problems.
I try to limit my stuff, but temptation gets a hold of me, in particular, my fabric stash. It's out of control.
There it is down there on the left. Three bins stuffed so full that I can't close them. It's even piled on top.
 Many ladies would say, "Posh, that's nothing. I have shelves...rooms...a basement...full of fabric." Yes, that's true for many sewers but most of those ladies might be called quilters or crafters. That's a whole different line of fabric hoarding, which I will not touch for now. These are all fabrics bought for clothing. Each bin has at least a two dozen projects.
What makes this a hoard for me is that I'm intensely uncomfortable with its size and embarrassed about the shear number of unfinished projects. During one previous move, I counted as I unpacked, the number was over 90. The stash has grown larger since that time. I hang my head in shame for all the clothes sitting there in those bins and not hanging in my closet.
I started fabric hoarding when I first moved away from my favorite fabric store nearly 20 years ago. At that time, they ran a mail order business and a quarterly newsletter went out. I bought from that newsletter like crazy woman, never finishing all the projects before the next newsletter arrived. I was desperately afraid I'd end up moving somewhere that fabric didn't exist. It turned out that happened several times over. Each time I got to a decent fabric store, I over bought. I couldn't say no in the face of the next fabric drought. So here I am today, trapped in a cycle of bounty and famine. I hoard fabric.
So the New Year has arrived, I have vowed to bust part of this stash this year. In my idealized mind, it should be less than three projects. I'll celebrate if I have one bin in December, but in reality if I go from three overflowing to two neatly organized bins I will have done well.
The next two projects are stash busters. I've chosen two pieces of cotton out of the bin and I'm hoping for two casual blouses.
I try to limit my stuff, but temptation gets a hold of me, in particular, my fabric stash. It's out of control.
There it is down there on the left. Three bins stuffed so full that I can't close them. It's even piled on top.

What makes this a hoard for me is that I'm intensely uncomfortable with its size and embarrassed about the shear number of unfinished projects. During one previous move, I counted as I unpacked, the number was over 90. The stash has grown larger since that time. I hang my head in shame for all the clothes sitting there in those bins and not hanging in my closet.
I started fabric hoarding when I first moved away from my favorite fabric store nearly 20 years ago. At that time, they ran a mail order business and a quarterly newsletter went out. I bought from that newsletter like crazy woman, never finishing all the projects before the next newsletter arrived. I was desperately afraid I'd end up moving somewhere that fabric didn't exist. It turned out that happened several times over. Each time I got to a decent fabric store, I over bought. I couldn't say no in the face of the next fabric drought. So here I am today, trapped in a cycle of bounty and famine. I hoard fabric.
So the New Year has arrived, I have vowed to bust part of this stash this year. In my idealized mind, it should be less than three projects. I'll celebrate if I have one bin in December, but in reality if I go from three overflowing to two neatly organized bins I will have done well.
The next two projects are stash busters. I've chosen two pieces of cotton out of the bin and I'm hoping for two casual blouses.
Thursday, January 22, 2015
Iron Deficiency
An iron used to be a highly useful household tool.
My mother's iron was indestructible and it was the same model as my grandmother's iron. If it needed a new cord, the hardware store had what you needed. If it needed a new heating element, the small appliance repairman in town could order the part. The iron was stainless steel, inside and out. You could descale it with citric acid and you could clean the sole plate with an old pair of nylon pantyhose and some baking soda. It had steam, but not enough for sewing or cotton shirts. We always used a damp pressing cloth or "sprinkled and rolled the clothes" to augment its steam power, but it was heavy. Oh my, was it heavy and pointy too. That old iron required the arms of a linebacker to finish a basket of clothes and I certainly remember being reminded again and again to "get the point of the iron around the buttons". In fact, my mother's and grandmother's collection of pressing equipment was rather short, a well padded ironing board, a tailor's ham, a water spritzer, a press cloth and a Turkish towel went along with the iron and that was it. My ironing accessories extend far beyond that in a desperate effort to overcome modern iron deficiency.
I have a love hate relationship with my most important piece of sewing equipment. The list of improvements from silicone treated sole plates to "electronically controlled heating" sends me right over the edge. Today's irons have a long list of design flaws.
The lovey rounded nose point might satisfy the health and safety lads, but you can't iron anything that isn't flat and wide. Forget about delicately shaping a hat ribbon or pressing open a narrow seam. Cuff plackets are simply impossible to iron properly any longer. The first criteria for choosing a sewing iron is a sharp point. If you can find one that is sharp enough to open a tin can, let me know.
The new irons have sleek, silky, silicone soles. Let me tell you a woman who is sleek, silky and silicone is high maintenance. An iron with the same characteristics is not only high maintenance but is limited in function. What is wrong with polished stainless steel? It is good enough for boat fittings on the high seas and it will be good for all of your household needs. I need an iron that can go from panty pressing to applying wax on skis and back again in one day. A polished stainless steel sole plate is infinitely cleanable and durable. A sole plate that doubles as a mirror is always helpful in a pinch.
When the stainless steel sole plate disappeared, so did much of the iron's weight. An iron needs to have weight to do its job. Today's irons are miracles of plastic, lightweight for sure, but you can't shape coat wool, set jeans hems, or make grilled sandwiches with any of them. If you can find an iron that will got through drywall when thrown, let me know.
Heat, weight, steam and effort combine to shape cloth. If one is lost, something must make up for it. In general, we've lost weight with modern irons and most of them make up the difference with steam power, but only for a bit. The heating/cooling cycle wreaks havoc with the plastic housing and in a few months what I have in my hand is a gurgling, dripping piece of electronic jetsam attached to the 240V line of my house. Iron at your own risk. In the last 10 years, I've bought four irons. Previous to that, I owned two! I'm considering buying a "dry" iron the next time around just for self-preservation.
Finally, the automatic shut-off....where do I begin. I suppose I could blame this on the health and safety lads again, but it's really about our own habits. If you leave the room, the iron is unplugged, off the ironing board, and stored in the cupboard. The cat/child/husband will never knock it off the board and start a fire. The argument about saving electricity should be one for the consumer. All irons have a manual on/off switch, use it if it's important to you.
I have spent the blog post ranting about what it wrong with modern irons not having given any sort of positive guidance about choosing an iron for yourself. An iron is a personal tool for each sewer. The kind of iron you need will be shaped by what you ultimately love to sew. Someone who tailors wool might value steam and weight. A quilter might value heat and a pointed sole plate.
For your first serious sewing tool, your iron should have a clean, unscorched, and unscratched sole plate. It should have a wide range of heat settings and a reasonable ability to produce some steam. I prefer to use the heaviest iron I can get my hands on and I consider the weekly ironing as part of my household workout. Features such as automatic shut-off and cord length are up to you.
The ironing board is as important as the iron itself. Choose one that is adjustable in height and has a sturdy wide surface. A well padded cotton work top is also well worth the investment. Stay away from the shiny metallic ironing board covers. You will end up with scorched fabrics. Pay top dollar for the board and it will last a lifetime.
To do the daily ironing and begin your sewing tool collection, the following items are essential. A cotton or linen press cloth and a spray bottle will augment your iron's steam output. An inexpensive white tea towel will do just fine as a press cloth. A cotton Turkish hand towel can be folded, rolled and shaped for additional padding when ironing your clothes. If you finally decide to try sewing clothing seriously, the next thing to buy is a tailor's ham, but other more specialized pressing equipment can wait until you hone your own sewing interests.
Friday, January 16, 2015
Vogue 7231 - 1952 The Slim Chemise Dress is Finished.

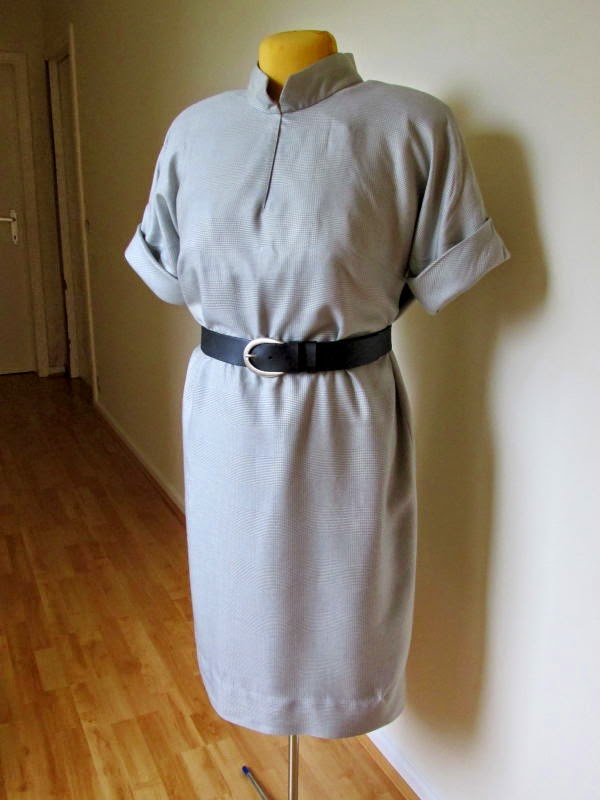
Garment Finish: I made mistakes and plenty of them.
The choice of fabric is poor. It's a soft lightweight suiting in a glen plaid which doesn't show up in the photos at all. It's there. The suiting shows every stitch. Even after being careful the hem shows. The suiting is as a loose weave. This means the V-neck slash is prone to stretching and raveling. Therefore the neckline stretched as well as the center V. There maybe no amount of careful pressing that will save those hot messes. C-
Fit: The dress looks to be an absolute disaster, especially on the dress form and I would definitely pass the dress by if shopping by hanger. On me? It's okay. Surprising, it's better on me than the dress form, usually it's the other way around. B

I think dress would be best in a cotton or cotton/linen blend, something a little crisper and with a tighter weave. B-
Style and Wearablitiy: The dress certainly transfers to today's wardrobe. Modern fabrics and colors would work very well. The dress is comfortable to wear and very forgiving to those with fluctuating waistlines. I'm actually surprised at the fit. Given what it looked like in my sewing room on the dress form I had been very reluctant to finish the garment and declare the whole project to be a wadder. The same fabric tie belt helps create a unified silhouette. A-
Overall: B-
I might just try this one more time.
Tuesday, January 13, 2015
A Word About Laundry
"LAUNDRY?! I thought this series is about learning to sew. I KNOWWWW how to do laundry!"
Fair enough, maybe you do know all about laundry. But, if you answer yes to any of these questions, you need to revisit your laundry skills before investing time and money in making garments for yourself.
- Do you only sort your clothes into three piles; whites, darks, and colors?
- Have you wanted to wear something only to put it on and find it stained or wrinkled?
- Do your white shirts and black pants all fade toward grey far too soon?
If you answer yes, then please consider revisiting your laundry guide that came with your machine.
After you know exactly what machine features you have, you need learn to read the laundry symbols on those garment tags. The website Textile Industry Affairs has a no nonsense complete guide to those symbols as well as answers to virtually every kind of laundry problem.
It is one of my personal reference sites for being comprehensive, although it does have a commercial tie with the Clorox bleach company. I tend to use chlorine bleach as a last resort and I prefer pre-treating and soaking before relying on any chlorine bleach. My front loading machine does not recommend using chlorine bleach because of the door gasket and my rural septic system prefers not to have bleach added to it.
Without too much detail, as everyone's laundry is a bit different and I could not, in any way, cover all the possible situations, these are my general laundry guide lines.
Sort by soil first.
Don't put your white athletic socks in the same pile as the white button down shirts.
Seriously, your red flannel pajamas should not be washed with your lime green tee-shirt.
Put similar colors together, reds and purples, greens, browns, and blues.
Sort by fabric and care labels.
You are wasting your clothing dollars if you wash yoga pants with jeans.
All buttons should be open and all zippers should be closed.
Again, you are wasting your time and money, if closed buttons tear your shirts.
Open zippers catch and wear fabrics, especially jean fly zippers.
Use as warm a wash temperature as you can.
Warm water removes soil better than extra soap and bleach. Always cold water rinse.
Dry on lowest setting for the least time possible.
Dryers are tough on clothes. Line dry as often as you can.
If you don't have time to dry, hang and fold the wash as soon as it is done. Don't start it. It's all wasted effort if it molders in the machine. Better to load and soak the wash while you are busy than to wash and forget it.
...And that is all I have to say about laundry. Next up? Your first big sewing purchase!
Thursday, January 8, 2015
Vogue 7231 - 1952 The Slim Chemise Dress - Three more drafts later....

and I don't mean beers, although in retrospect it might have helped. I arrived at this interpretation of the Slim Chemise Dress. There was one glaring error that I didn't see until it was too late.
 Here is the toile for the third draft. I thought, "Great! I've got it." Looking back, all I see is the error glaring at me front and center.
I chose some cotton print for this first attempt at a real garment. I decided on these two complementary leaf motif prints and I decided to make a blouse from this pattern rather than a full dress. The brown print will the main body of the shirt, while the green will be the cuffs and interfacings.

 I decided to add a little detail to the sleeves by putting four buttons and loops for each sleeve cuff. I wanted it to appear as if the cuffs buttoned on to the sleeve.
I wanted it to appear as if the cuffs buttoned on to the sleeve.


The blouse modeled by the sewer. My apologies for the grim face and poor lighting. I can't believe I made that mistake and winter in northern Europe only has so much daylight in any one week.
Wednesday, January 7, 2015
The New Year and A Finished Slim Chemise Dress

I find drafting from scratch hard and time consuming. I know I would benefit greatly from a well-developed course on pattern drafting but time, location, and funding have put that off for the a while.
I am reasonably pleased with the results of the dress. It's a bright sunny morning today. I'm hoping photos will happen this afternoon.
Wednesday, December 31, 2014
The Sewing You Already Own
Today's post is about the sewing you already have. Yes, the closet full of clothes that has spilled out onto the floor.
"But I didn't sew that!"
True, you didn't, but someone did. Someone else designed and manufactured every item in your closet and then you bought it. You were only involved in the last step, acquisition. By learning to sew, you are consciously choosing to take responsibility for the design and manufacturing of at least some part of your wardrobe. This means that you need to learn something about what you already have.
Many people shop for clothing without a real sense of purpose. They wander through the department stores looking at clothes until they spy something they "just have to have." We've all done it. Combine the "Oohhh look! That's pretty." with "OMG, it's 60% off!" and "They have it in MY size!" and we are all doomed. It can be a lovely way to spend an afternoon, but if we do it all the time we end up with a closet stuffed full of clothing and nothing to wear.
So the first step in learning to sew your own clothes is learning about the clothes you already own. Many wardrobe clean out advice columns begin with emptying the whole closet and making piles around the room of "give aways" and "charities" and "trash". I find this doesn't work very well for two reasons. The first being if all the clothes are piled about what you end up with is a wrinkled mess. Secondly, you also end up with multiple piles of clothing to go out the door to new destinations at the same time. They don't make it out the door that day....they languish in the corner until the weekend and the weekend becomes next month and then half or more of what you have discarded is back in the closet.
Below I have a seven step process for find your true wardrobe. Don't do it all at once. It's should be done in multiple sessions with the goal of each session being the removal of the discarded items from the house that day. Your time and decision making process are most valuable. Plan your discard action before starting to weed your closet. Having cast-off's crawl back into your closet through second guessing yourself is being disrespectful to yourself and your time. You can make the right decision up front. Prepare to back your decision with action.
The first step is to look carefully at the list you made from the previous post, the one about your various roles in life. Have this available to you as you begin to evaluate your closet. Have also an index card with you for any new clothing you may desperately need after you are ruthlessly brutal with yourself. Yes, at the end you may get to go shopping.
STEP ONE: LONG TERM STORAGE
Remove from your closet all items of clothing that would be better off in long term storage. These are usually things that are too sentimental to part with but you'll not be wearing them again. Your closet space is too valuable for things like wedding dresses, bridesmaid dresses, old boyfriend's flannel shirts and your precious signed Grateful Dead tee shirt. Vintage items that are too fragile to wear also fall into this category. Take these items out and store them appropriately elsewhere.
STEP TWO: THE TRASH
Remove the trash from your wardrobe. The stuff that is so torn, stained, and old that you would only wear it when changing the oil in the car, nursing vomiting children and or applying fake tan for the first time in the privacy of your own bathroom. Be ruthless....trash the underwear too! Put it all into a trash bag and get it to the curb today. What you don't want it is to have this stuff sneak back into the closet. You are better than that and you deserve clothes that are not rejects from a charity shop. Throw it out! There is one caveat here....look at your roles list if you need trash clothing you are allowed to keep some of it. Be very honest with yourself. If you renovate old houses on the weekend, you need two to three complete outfits for painting and plumbing, but not sixteen. If you work in an office, live in an apartment and are able to keep your nails manicured 365 days per year you'll need nothing in this category. Remember keep only what you will wear between being able to wash.
STEP THREE: RECYCLE
Remove from your wardrobe anything that doesn't fit but is still nice enough for someone else to wear. If it is too small, remove it. If is too large, remove it. If you don't like, remove it. If it was a gift that just wasn't right, remove it. If every time you wear the item, it just doesn't seem right, but "oh well, I've got nothing else", remove it. Do this step by yourself. Don't rush this process. Use the mirror and your camera to get a good idea if you really should be wearing an item. If in doubt, throw it out. Now, depending on your local resources, all these items need to be taken to charity or a consignment shop right away. Get them out of the house. There should be no second guessing your hard work a day or two later.
STEP FOUR: WHAT'S LEFT
What's left? It should fit and you should feel good about wearing it. There's one more round of weeding that needs to be done. Fitting your wardrobe to your lifestyle. Take a look at what's left. Have you got 15 little black dresses and you really only need two. Keep only the two you love the most. Do you have 30 pairs of jeans and only need 3 pairs? How many tee shirts can you wear in one week? Eliminate the excess, even if it fits keep only the items you really love and balance the number of items against your specific lifestyle activities. Take these items to the appropriate charity right away also.
STEP FIVE: OFF-SEASON CLOTHING
What's left now? It might be painful is a few spots, but we are not finished yet. I mentally divide my clothing into three groups, the core, summer clothes and winter clothes. My core wardrobe stays in the closet year round. This includes things like blue jeans, white tee shirts, white blouses, ....a navy cardigan sweater. There are real basics that I wear weekly and year round. This is where I spend most of my clothing dollar. My summer and winter clothes are just that, clothes that get stored for half the year, anything from sundresses to ski sweaters. Remove these items from your wardrobe and store your off-season clothing.
STEP SIX: WHAT'S LEFT?
Now you should be left with clothes that fit, you feel good about and what's in season. You may also feel that you do not have enough to wear. More than likely you have just what you need, but there may be a few items that need replenished. Examine your lifestyle list against the clothes that you have remaining in your closet. It's time to make a list for shopping and sewing. You will need to carefully and conservatively make your list. Err on the side of too little. Remember, as you learn to sew, you will add to your wardrobe as easily as shopping for ready made items. At this point, you may need to replace underwear and bras, jeans, basic tee shirts and specific clothes needed for your job. Write up your list on the index card. Do you need the back of the card or multiple cards? Re-examine the shopping list and think about the minimum you need. At this point you should need only one card for your purse. Shop at this time only for these items.
STEP SEVEN: YOUR WARDROBE
You've got it. Just what you need and want in your closet. Take a step back and look. What's there? Can you identify a color palette that you are naturally drawn toward? How about cut and fit? Fabrics? Easy care or dry clean? Write these down in your idea book and compare them to the images you've collected. Reflect on what you have learned and refocus your idea book.
Sunday, December 28, 2014
Mirror, Mirror ... on the wall...
"Uncontrolled chaos sounds fun"....Oh, it can be fun and for some extremely rewarding. You may already be on the path to sewing chaos by being the person who received a sewing machine and not a mirror for Christmas. Congratulations! Have fun! But many experienced sewers will also hear from you in a month or two.
"Help! I've got this project and I can't finish it. Will you help me?" ...and in a crumpled paper bag you will have the remains of your first sewing project. It will be consist of $80, $10 or $400 worth of crushed rayon velvet, Goodwill purchased poly/cotton sheets from the 1970's, or uneven woolen tartan bought by your mother-in-law on her one and only vacation to Scotland. You will need to have the party dress, curtains, or suit finished in two hours, two days or two weeks. You will have cut the dress front with the velvet nap going up and the back with the nap going down. The curtains are in good shape except for the last panel which is seven inches too short and you are out of sheets. The suit is cut but the plaid is unmatched and you did make it through constructing the skirt but the waist is too tight. Can I alter the skirt to fit?
Believe me, I've seen it all. I'll make you a mug of tea and listen to your tale of woe. I'll let you tell me all about your aspirations and then I'll be harsher that you can ever imagine. I'll tell you in the kindest way possible. "The only place for the contents of that crushed paper bag is the garbage bin." I cannot help you. I will not help you and our friendship is probably doomed.
Nearly all first time sewers make these mistakes, they fail to match their level of ability to project difficulty and fabric appropriateness. It happens. It happens most frequently to new sewers, but even experienced dressmakers have "wadders." Have two or three disasters in a row and real self doubt sets in. But have something come out as a smashing success, that feeling will be there with you every time you wear the garment.
Are you ready for flight school? It's assignment time.
Assignment #1:
Have you started your "Idea Journal"? Pull up a chair, a mug of tea and some day dreaming time and take a look at what you've collected. Do you dream of high end fashion? Do you want to push the envelope of conventional clothing definitions? Do you prefer home decor? Crafty items? Knitwear? Do you dream of silk cocktail dresses or tweed suits? Do you want to recreate vintage items? Do you want clothes that fit better? What are your interests? Try and identify some trends. Write six to eight sentences about what you dream about doing.
My sentences would be.
I want to sew clothes that fit me.
I want to have really nice clothing, that lasts for years.
I like classic lines, and traditional fabrics.
I am drawn to vintage clothing especially items from the 1930's to the mid 1950's.
I want to include vintage ideas into my wardrobe without becoming costume or campy.
I want to save a ton of money on home decor because I have designer tastes and a thrift store budget.
I want to be able to sew some of my clothes but also be able to buy quality RTW at all price points.
Assignment #2:
Take an honest look at your lifestyle. What kind of activities, jobs, or roles to you have in your life? Define each one. You may be a parent or care giver. You may have a job that has specific dress codes. Your hobbies might have clothing requirements. A parent of two year old twins might wish for clothes impermeable to grape jelly and craft paint. An office worker dresses one way and police officer another. A gardener wears one thing and museum docent another.
Make a list of as many of your roles as you can. Try and quantify how large a part of your time you spend in each roles. It is from this list that you will begin to guide your sewing and wardrobe. From each of these activities or clothing needs you can direct you project choices.
Here's the beginning and end of my list. I want you to write your own.
My largest role is housekeeper. I need clothing that is tough and comfortable and classic and washable.
My smallest role is bar hopping party girl. I need only one versatile outfit for this one that is worn once per year or less.
From this list, the vast majority of my clothes consists of sportswear separates and no sequins.
You should use these two lists along with your own geography and climate to help you choose your wardrobe pieces and sewing projects. I should be making easy wear tops to go with jeans, shirt dresses, and active wear and outerwear for all kinds of variable weather. I should not be making party dresses, office wear, Hawaiian shirts or Edwardian reproductions no matter how much I like the patterns and fabric. Even if you decide sewing is not for you, knowing how much of what kind of clothing belongs in your wardrobe is cost saving. (I don't always follow this advice 100% of the time, but 9 times out of 10 it works.)
Subscribe to:
Posts (Atom)
-
Now, it is nearly March. The winter was a tough one and it is not over yet. Weather and health were the two main foci. The snow and ice have...
-
 Dear Readers, December has come, dark, rainy, wet, miserable December. A month better designated for hibernation than celebration....